Human Resources > Workforce Administration > Search > Employee > Jobs
The Jobs tab contains job, position, payroll and general ledger (G/L) distribution data for each employee.
Note: In contrast, the Employment tab contains data pertaining to an employee's employment status.
From here, you are able to set up additional rates of pay and general ledger distributions for an employee who works multiple positions, eliminating the need to do manual overrides in Hours Entry and ensuring that earnings are expensed to the appropriate departments.
The grid at the top of this tab contains all of the data about an employee's primary work assignment and, if applicable, secondary work assignment(s), such as seasonal jobs.
Note: The first time you add an employee's data on this tab, a record containing only the Effective Date that was entered in the Create Employee process defaults in the grid; essentially, therefore, you are editing the first record.
Each row in the grid corresponds to a job. The primary job always appears in the top row and shows a green check mark ![]() in the Primary column.
in the Primary column.
Unless you are recording a new job event or editing an existing one, the data in this section is presented in view-only mode.
Secondary jobs associated with job event reasons of Out of Position are not visible in the default display.
Users who are not authorized to departmental data through Process Manager > Payroll-Department/Employee Inquiry are prohibited from adding or editing a job record.
Sample scenario: A user is authorized to edit the records of Police Department employees only. An employee transfers from the Parks and Rec Department to the Police Department. The user can view the employee's past and current job records but cannot edit job records from the Parks and Rec Department.
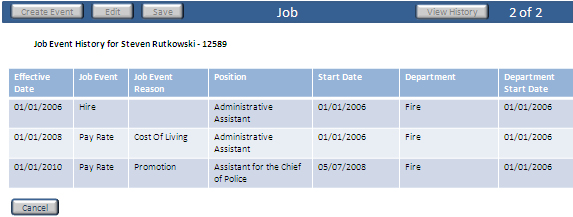
To view the employee's job event history, click the History View button, located on the right side of the Jobs section header.
A grid populated with the basic data of the employee's job event history displays below the section header, with each row corresponding to a job event. Rows are sorted by effective Date Range, from latest to earliest.
Note: Clicking on a marker in the timeline also refreshes the data in this section to reflect the corresponding effective-dated period.
To view all of the employee's jobs, open or closed, click the View All button, located on the right side of the Jobs section header.
A grid populated with the basic data of the employee's job history displays below the section header, with each row corresponding to a job.
Note: Clicking on a marker in the timeline also refreshes the data in this section to reflect the corresponding effective-dated period.
If comments have been attached to a job event, a highlighted icon displays in the Comments column. Hover the cursor over the Job Event to see the comments.
Any change to a primary job requires the use of the Create Event button. This function tracks the history of changes to the pay rate and other job data, creating a snapshot of the job in time.
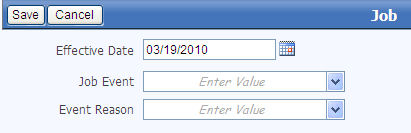
To record a primary job event with a new effective date, select the row containing the primary job, and click the Create Event button, located on the left side of the Jobs section header. To record a secondary job event with a new effective date, select the appropriate row in the grid, and click the Create Event button. A pop-up opens, asking for the Effective Date of the job. This date must be later than or the same as the Effective Date of the current primary job.
Once you have selected the date, click OK. If the End Date of the original job was Open in the Date Range column of the grid, it is closed with the Effective Date of the new job, and the new job displays an Open end date.
Data in the Job Detail, Job Event/Reason, Position, Payroll and G/L Distribution sections carries forward to the new effective-dated period; Job Event, Event Reason and Comments, however, are cleared. All fields in all sections of the Jobs tab change to an ![]() editable state, the Effective Date in the Job Detail section contains the date selected on the pop-up, and Save and Cancel buttons replace the original buttons in the section header.
editable state, the Effective Date in the Job Detail section contains the date selected on the pop-up, and Save and Cancel buttons replace the original buttons in the section header.
Note: When the Create Event button is used to make a change to any part of an employee's job, all of the position, payroll and general ledger data carries forward to the new effective-dated period.
If you do not want to save your entries, click Cancel. Data is restored to its last-saved state. If you are satisfied with your entries, click Save. The job data updates, and the new effective date displays in the top-left corner of the section, immediately below the section header.
To save your entries and clear the detail section for the entry of another primary or secondary job, click Save/New.
To add a secondary job to the grid on the Jobs tab, click the New button, located on the left side of the section header. All fields in the Secondary Job Detail, Job Even/Reason, Position, Payroll and G/L Distribution sections become available for entry. Some populate with default entries but are editable.
Note: Some fields available in the Position and Payroll sections for a primary job are hidden. The field description tables for those sections identify the hidden fields.
To correct saved data for a primary or secondary job, click the edit icon ![]() , located in the far-left cell of the appropriate row. All fields, except for the Effective Date, change to an
, located in the far-left cell of the appropriate row. All fields, except for the Effective Date, change to an ![]() editable state, and Save and Cancel buttons replace the original buttons in the section header.
editable state, and Save and Cancel buttons replace the original buttons in the section header.
Once you save new or edited data, the original buttons replace the Save and Cancel buttons, and the data returns to view-only mode.
If you do not want to save your entries, click Cancel. Data is restored to its last-saved state. If you are satisfied with your entries, click Save. The job data updates, and the new effective date displays in the top-left corner of the section, immediately below the section header.
To delete a job from the grid, click the delete icon ![]() , located immediately to the left of the Primary cell in the appropriate row. A dialog prompts you to confirm the delete.
, located immediately to the left of the Primary cell in the appropriate row. A dialog prompts you to confirm the delete.
Note: When you delete an effective-dated period, all position, payroll and general ledger data tied to the employee within the effective-dated period is removed as well.
If multiple events have been recorded for the same job, you may view the data associated with those events, including the changes made over time, by selecting the appropriate job in the grid and clicking the left and right arrows of the navigation control, located on the right side of the section header. ![]() Show me.
Show me.

Note: Clicking on a marker in the timeline also refreshes the data in this section to reflect the corresponding effective-dated period.
Note: The Job Detail section does not display for records tied to departments to which you are unauthorized.
The following table contains descriptions of the fields in this section:
| Field | Description |
|---|---|
| Effective Date |
Enabled when Create Event is clicked, date the job event goes into effect. This field may contain a future date. If the Job Event is associated with an Out of Position status in Job Events Maintenance, the Effective Date is considered as the Out of Position date, ending the position. Once Save is clicked, a COBRA pop-up opens. |
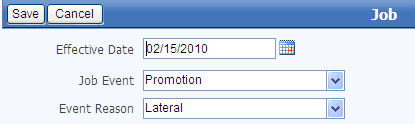
| Job Event |
Identifies a change in job status, such as the awarding of a promotion, the application of a new pay rate or the changing of responsibilities. Click in the field to select from a list of active job events. Job events are created and maintained in Job Events Maintenance. |
| Event Reason | Reason precipitating an employee's Job Event. Examples may include cost of living or job reclassification. |
| Last Changed | Identifies the person who last changed this job record and the date it was changed. This data is generated automatically and is view-only. |
| Comments | Additional comments related to the currently displayed job event, typically to provide the details to differentiate this event from others. Comments may contain 1,000 characters. |
Use this section to record and report on multiple job events that are effective on the same date
Job events and reasons related to the selected job display in a grid in descending sequence number order, from most current event to least.
When adding or editing a job event, you may specify a ![]() sequence number.
sequence number.
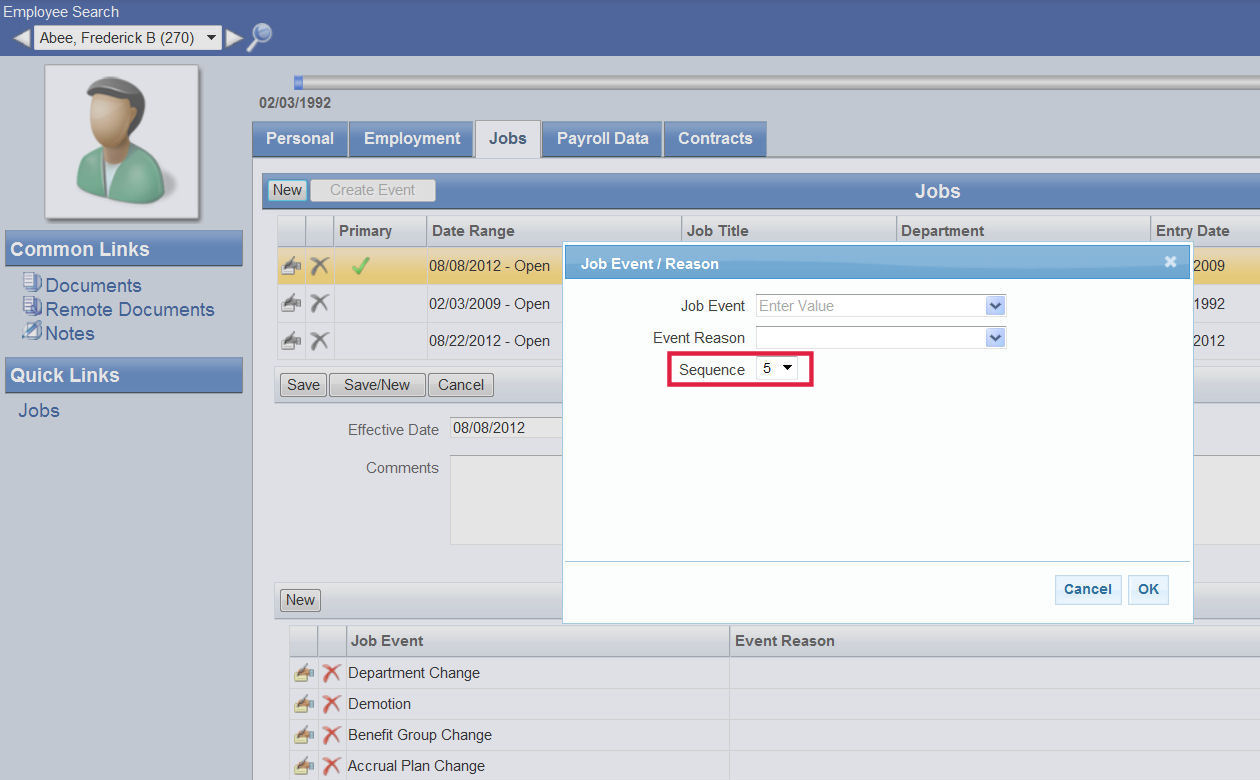
The order of sequence numbers tells which event is the most current, with the highest sequence number being the one that is placed on the job and that determines whether an employee is Out of Position.
The sequence number for an event may be changed. Multiple events on the same day cannot have the same sequence number.
Although most of the fields in the Position section are populated automatically from Position Control Maintenance, the entries may be overridden.
| Field | Description |
|---|---|
| Position Type | |
| Position |
Required if Title field is not used, description of the position or position title. Click in the field to select from a drop-down of available positions. Position numbers and names appear on the drop-down based on their effective dates in Position Maintenance. Their statuses must be Active, and their Applies to Budget selections must be Budgeted or Not Budgeted. Position numbers also are formatted automatically according to the Position Number Mask set up on the System-Assigned Numbers frame of Company HR Settings. Note: A selection in this field clears the Title field. |
| Title | Required if Position field is not used, official title of the position. This entry may contain 64 characters. |
| Certification |
Display-only, identifying whether an employee is assigned to a certified or non-certified position. If the employee's position is certified on the Position page in Maintenance, Certified displays; if the position is non-certified or if the field to indicate certification is blank in Maintenance, Non-Certified displays. The field is visible if the G/L Distribution for Certified Positions check box is selected on the Financial Management Setup page of Company HR Settings. |
| Position Entry Date | Required if a Position or Title is selected. Date the selected employee was assigned to begin working in the position. If the position changes, the field is cleared. |
| Department |
Required. Identifies the department the position belongs to. When a new hire is assigned to this position, this field populates automatically from Position Maintenance, provided the user has been authorized to the department selected. |
| Department Entry Date | Date the selected employee was assigned to the department the position belongs to. If the department changes, the field is cleared. |
| Union Code | Identifies the union the position belongs to. Click in the field to select from a drop-down of valid union codes. If a Position has been selected, this field populates automatically from Position Maintenance. |
| Work Site | Physical location where the work occurs. Click in the field to select from a drop-down of valid work sites. If a Position has been selected, this field populates automatically from Position Maintenance. |
| Workers' Comp Code |
Workers' comp code for the position. The workers' comp rate is based on the type of work the employee does. For a new hire assigned to the position, this code defaults from Position Maintenance and is used to budget for workers' compensation premiums in Position Budgeting. |
| EEOC Category |
Used in generating the EEOC (Equal Employment Opportunity Commission) Standard Form 100 to be filed with the federal government, tells the type of position. For a new hire assigned to the position, this entry defaults from Position Control Maintenance. This field is available for secondary jobs, also. |
| EEOC Function |
Used in generating the EEOC Form 164. For a new hire assigned to the position, this entry defaults from Position Control Maintenance. This field is available for secondary jobs, also. |
| Plan Information | |
| Benefit Group |
Required. Identifies the benefit group the position belongs to. When a new hire is assigned to this position, this field and the hours and schedule entries populate automatically from Position Control Maintenance. Based on the Benefit Group selected, the Daily Hours, Cycle Hours and Annual Hours fields also populate automatically. |
| Benefit Exception |
Exception-based benefit plan, if applicable. An exception-based benefit plan tags individual employees with different rules within benefit groups; such a plan, for example, may apply to an employee who, though part of the selected Benefit Group, may be qualified for an alternate plan. If the benefit plan associated with the selected Benefit Group has exceptions, click in the field to select from a drop-down of available selections. Only the exception codes associated with the plan are listed on the drop-down. Note: If an exception-based rule set is not associated with the selected benefit plan, this field is disabled. Note: This field is hidden for a secondary job. |
| Accrual Plan |
Accrual plan that applies to the Position and Benefit Group selected. Click in the field to select from a drop-down of available selections. Accrual plans are created and maintained in Accrual Plans Maintenance. Note: This field is hidden for a secondary job. |
| Accrual Exception |
Exception-based accrual plan, if applicable. An exception-based accrual plan may apply to an employee who, though a participant in the same accrual profile as others, may be paid at a different rate. Click in the field to select from a drop-down of available exception codes. Only the codes associated with the plan are listed on the drop-down. Note: If an exception-based rule set is not associated with the selected Accrual Plan, this field is disabled. Note: This field is hidden for a secondary job. |
| Longevity Plan | Longevity plan that applies to the Position and Benefit Group selected. Click in the field to select from a drop-down of available selections. Longevity plans are created and maintained in Longevity Plans Maintenance. |
| Longevity Exception |
Exception-based longevity plan, if applicable. An exception-based longevity plan may apply to an employee who, though a participant in the same longevity plan as others, may be qualified for an alternate plan. Click in the field to select from a drop-down of available exception codes. Only the codes associated with the plan are listed on the drop-down. Note: If an exception-based rule set is not associated with the selected Longevity Plan, this field is disabled. |
| Plan Calculation Percent |
Used when the following are calculated: accruals, longevity and the percent of plan costs an employee pays for benefits. Note: This field is hidden for a secondary job. |
| Budgeting Information | |
| Position FTE |
Required if a Position has been selected, tells the number of employees (full-time equivalents) who may be active in this position at one time. This entry defaults from Position Control Maintenance. When the job record is saved, if this entry exceeds the total FTEs allocated for the position in Position Control Maintenance, a warning message displays. |
| Daily Hours | Required. Number of work hours assigned to this position per day. |
| Cycle Hours | Required. Number of work hours assigned to this position per pay cycle. |
| Annual Hours | Required. Number of work hours assigned to this position per year. |
Note: Whenever a new Position is selected, all related fields repopulate with the relevant data.
If you do not want to save your entries, click Cancel. If you are satisfied with your entries, click Save. The job data updates, and the new effective date displays in the top-left corner of the section, immediately below the section header.
Use this section to track civil service data for certifying the payrolls of county employees. This section contains many of the fields from the Roster Card-Positions page (Human Resources > Roster Cards > Roster Employees List > Employee > Positions).
Note: A roster employee is one whose rate of pay is commensurate with his position title. Through exams or other formalized requirements, this employee has been certified to hold the title.
Set up county roster card positions at Maintenance > Human Resources > Roster Cards > Roster Positions.
Note: This section is visible only if you are licensed to the Roster Cards module.
| Field | Description |
|---|---|
| Civil Service Status | Describes the civil service property rights that an employee has for the current position and the previous position if serving in a non-permanent appointment. The statuses available for selection come from validation set 291, Roster Civil Service Status (Maintenance > new world ERP Suite > System > Validation Sets > Validation Set List). Sample statuses: Permanent-CS Status, Provisional-CS Status, Provisional-No CS Status, Temp/Seas-No CS Status. |
| Civil Service Authorization | The controlling information source or document for the transaction. This free-form entry also may include the date the civil service change was authorized. Sample entries: Report of Personnel Change (04.11.14); Salary Change Notice (10.15.14). |
| Authorization Date | Used for tracking civil service authorization changes. |
| Eligible List Number | Free-form text referencing the eligible list number used for the appointment. Sample entries: 234ED-34, 0345-P. |
| Civil Service Seniority Date | Date of original permanent appointment in classified service, specific to that agency if the employee is working in multiple agencies. |
| Appointment Start Date | Date appointed to current position. |
| Appointment End Date | Used for tracking fixed-term appointments that have specific end dates. This field may be blank, even if the Appointment Start Date is filled in. |
| Firefighter Status | Identifies the roster employee's firefighter status, if applicable. Available statuses come from validation set 289, Roster Employee Fire Fighter Codes (Maintenance > new world ERP Suite > System > Validation Sets > Validation Set List). |
| Jurisdictional Class | Viewable field only from Roster Position. View the Jurisdictional Class on the Roster Position using the effective date logic.+ If the position is not a roster position, this field is blank. |
| Class Specification | Display only entry from the Roster Position page in Maintenance. Sample specification: Trades.Parks.Park Superintendent. If the position is not a roster position, the field is blank. |
| Comments | Free-form text describing the history of the position. An example might be a description of why the civil service record changed, perhaps as a result of stipulation or settlement. |
| First Review Date | First date the employee's roster card data is reviewed. |
| First Review Reason | Free-form text. |
| Next Review Date | Second date the employee's roster card data is reviewed. |
| Next Review Reason | Free-form text. |
| Retention Date | For county and non-county (Human Resources > Roster Cards > Roster Employee List) employees who are wartime veterans, identifies additional time toward seniority; for example, if a layoff were to occur, people who have served in the military would have a different date of seniority due to the Retention Date and would have time added to their seniority. The additional time would be placed in the Retention Date. |
| Probation Start Date | Date range of employee's probation period. |
| Probation End Date | |
| Roster Hire Date | Defaults employee hire date, though it may be overwritten. |
| Substitute | Identifies whether employee is a substitute. |
Enter the data for newly hired county roster employees through the Jobs tab of Workforce Administration. This data includes the roster position. After saving the data, you may view it at Human Resources > Roster Cards > Roster Employee List. The General and Positions pages are not editable from there.
Enter the name, address and demographics data for non-county roster employees through Workforce Administration. If a non-county employee becomes a county employee, the demographics data is used.
Note: Once someone becomes a county employee, the demographics data comes exclusively from Workforce Administration.
You may view civil service changes that have been made to county roster employees through the Jobs tab of Workforce Administration at Human Resources > Roster Cards > Roster Employee > Positions. The General and Positions pages are not editable from there. You may edit data in Workforce Administration, and it displays in Roster Employee.
If the data has changed, create an event on the Jobs tab of Workforce Administration and select a civil service job event status. You may view this data as an additional record at Human Resources > Roster Cards > Roster Employee > Positions.
Maintain the name, address and demographics data for non-county roster employees in Workforce Administration. Maintain the position data at Human Resources > Roster Cards > Roster Employee > Positions.
County positions created after the Changeover Date may be viewed only. County positions created before the Changeover Date may be edited at any time. Non-county positions also may be edited at any time.
This section contains an employee's payroll data related to the selected job.
Based on the Position assigned to the employee, the fields in this section populate with default entries, or the selections on their dropdowns are filtered to simplify entry.
If Create Event![]()
 has been used to change all or part of the employee's job data, all of the payroll data in this section carries forward to the new effective-dated period and is available for editing.
If Delete Event![]()
 has been used to delete an effective-date period of the employee's job, all payroll data tied to the employee within the effective-dated period is deleted, also.
To edit payroll data, click the Edit button, located on the left side of the Jobs section header. The fields in the Payroll section are enabled for entry, and Save and Cancel buttons replace the original buttons in the section header.
If you do not want to save your entries, click Cancel. If you are satisfied with your entries, click Save. The payroll data updates, and the original buttons replace the Save and Cancel buttons in the Jobs section header.
The following table contains descriptions of the fields in the Payroll section:
| Field | Description |
|---|---|
| Pay Group |
Required. Identifies the employee's pay group, such as weekly or bi-weekly. Click the field prompt to select from a drop-down list of valid pay groups. If a Position has been selected, this entry defaults based on the selection. |
| Grade |
Required. Combination of the pay grade code and description. If a Position has been selected, this entry defaults based on the selection. |
| Rate |
Required. Employee's pay rate, filtered by Grade. The field is a drop-down or a numeric field, depending on the grade selected. If the grade uses steps, it is a drop-down listing the steps associated with the grade. If the grade does not use steps, it is a numeric field whose minimum value is based on the minimum for the grade and whose maximum value is based on the maximum for the grade. If Employee Pay Rate is checked in the Payroll Override Security section of the User-Based Security page, you have the authority to override the minimum or maximum value. |
| Salary Hours Code | Visible and required if the Grade selected is salaried. |
| Special Assignment |
Code identifying an additional amount of pay to be added to the hourly amount for an hourly or grade/step employee. An example of a special assignment may be that of a police officer who also is a SWAT team member. Once in the assignment, the officer is paid at that rate until the assignment ends. Click the field prompt to select from a drop-down list of available special assignment codes. |
| Project |
Project code to which hours are to be charged. This entry links to Financial Management Projects. It is overridden if a Project is selected on the employee's schedule. Click the field prompt to select from a drop-down list of available project codes. Note: This field is displayed only if you are licensed to Projects. |
| FLSA | FLSA category code. Click the field prompt to select from a drop-down list of available codes. |
| FLSA Rate |
Override pay amount the employee receives for FLSA if qualified in a given pay period. This amount is the weighted average hourly rate of pay for FLSA hours. Use this field when the New World ERP FLSA calculation does not match what you need—for example, when you need FLSA applied to a future month.
|
| Eligible for Holiday Time |
Determines whether the employee is eligible for holiday time. Note: This field is hidden for a secondary job. |
| Holiday Hours |
Four-decimal, numeric field. Note: This field is hidden for a secondary job. |
| Pay Type |
View-only entry, Annual, Hourlyor Salary, determined by the Grade selected. If the Pay Type is Salary, the Hours Code and Pay Period Amount are defaulted from the Position. If a Position has been selected, this entry defaults based on the selection. |
| Grade Minimum | The minimum pay for the Grade selected. This number is view-only. |
| Grade Maximum | The maximum pay for the Grade selected. This number is view-only. |
|
This grid contains all pay rates that apply to the employee, including hourly, pay period and annual amounts. The data is view-only. |
|
After adding or editing payroll data, click the Savebutton, located on the left side of the Jobs section header. The section returns to view-only mode, with the latest data displayed. To save the data and clear the entry of another payroll record, click the Save/New button.
To assign user rights to the Payroll section, follow these steps:
- Navigate to Maintenance > new world ERP Suite > Security > Users. The User List page opens.
- Select (highlight) the user to have rights to the Payroll section.
- Click Permissions. The Permissions page for the selected user opens, showing a grid of application components.
- Click the Show Search link in the top-right corner of the page. The Component Name, Application and Company Name search fields display.
- In the Component Name field, type Workforce Administration Jobs - Payroll.
- Select the Human Resources Application.
- Click Search. The grid refreshes to show only the Payrollcomponent.
- Check the appropriate processes to assign the user.
- Click Save.
- For the authorization to take effect, the user must sign off and sign on the system.
The grid in this section contains an employee's default general ledger (G/L) distributions data corresponding with the effective-dated period selected for the employee's job.
Note: An employee newly added to Workforce Administration remains in a "Pending" status until this data has been entered.
An employee who works in multiple departments with costs distributed between them may have multiple distributions.
Based on the Position assigned to the employee, the grid populates with default data that may be edited.
Each distribution corresponds to a row in the grid. The rows are sorted in ascending numerical order by G/L Distribution organization sets or account numbers, followed by descriptions.
If Create Event has been used to change all or part of the employee's job data, all of the G/L distribution data in this section carries forward to the new effective-dated period and is available for editing.
If Delete Event has been used to delete an effective-date period of the employee's job, all of the G/L distributions tied to the employee within the effective-dated period are deleted, also.
To add a G/L distribution to the grid, highlight the appropriate row in the grid, click the Edit Distribution button, then the New Distribution button in the Edit Distribution pop-up. A new blank row is added to the grid and highlighted, and the G/L Distribution, Project and Percent fields are enabled for entry.
Since 100% is charged to one G/L account for most employees, 100% defaults in the Percent field. This entry may be edited, but the total of all G/L distributions still must equal 100%.
To edit a G/L distribution, click the Edit button, located on the left side of the section header. Data in the entire Jobs section is enabled for editing, and a G/L Distribution pop-up opens, containing a grid of the G/L distributions set up for the employee as of the Effective Date set up on the Jobs tab. Each row of the grid contains edit and delete icons. ![]() Show me.
Show me.
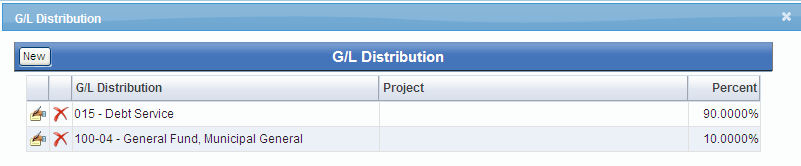
Click the edit icon ![]() , located in the far-left cell of the appropriate row. The G/L Distribution Detail section opens below the grid, with the appropriate data available for editing. The grid row being edited is highlighted.
, located in the far-left cell of the appropriate row. The G/L Distribution Detail section opens below the grid, with the appropriate data available for editing. The grid row being edited is highlighted.
Note: The New Distribution button remains disabled until data has been saved in the section.
Note: If all distribution percentages do not add up to 100%, an error message displays.
To edit a G/L distribution, click the Edit button, located on the left side of the section header. Data in the entire Jobs section is enabled for editing, and a G/L Distribution pop-up opens, containing a grid of the G/L distributions set up for the employee as of the Effective Date set up on the Jobs tab. Each row of the grid contains edit and delete icons. ![]() Show me.
Show me.
Click the delete icon ![]() , located in the cell immediately to the left of the appropriate G/L Distribution. A dialog prompts you to confirm that you want to delete. Once you click OK, a validation is performed to ensure that all percentages still add up to 100.
, located in the cell immediately to the left of the appropriate G/L Distribution. A dialog prompts you to confirm that you want to delete. Once you click OK, a validation is performed to ensure that all percentages still add up to 100.
If the validation succeeds, the pop-up closes, and the main grid in the G/L Distribution section updates; if the validation fails, an error message displays.
The following table contains descriptions of the fields in the G/L Distribution Detail section:
| Field | Description |
|---|---|
| G/L Distribution |
Required. Account to receive the distribution. Click in the field to select from a drop-down list of available accounts. The Distribute Employee Cost by Organization check box in Company HR Settings determines whether each employee is assigned an organization set (Fund-Dept.) or a full G/L account (Fund-Dept-Account) when employee costs are distributed. If it is unchecked, the organization sets (positions 1 through 6) and associated accounts (positions 7 and 8, after the decimal) display on the G/L Distribution drop-down. If it is checked, only the organization sets display. If this box is checked, each employee may be assigned an organization set only. When payroll is run, the account selected for the hours code, tax code, benefit code and workers' comp code are used to create a full G/L expense account. If the box is unchecked, each employee may be assigned a full G/L account, and the account information on the hours code is ignored. To conduct an extended search for the appropriate account, click the blue eyeball |
| Project |
Project to which the distribution is charged. Click in the field to select from a drop-down list of available projects set up in Maintenance. To conduct an extended search for the appropriate project, click the blue eyeball |
| Percent |
Percent of cost expensed, or distributed, to the organization set or account selected in the G/L Distribution field. This entry may contain up to four decimal places. The percent of all G/L accounts selected must total 100 %. |
 that displays to the right of the field if the Distribute Employee Cost by Organization box is unchecked in Company HR Settings.
 , located to the right of the field.
After adding or editing each distribution, click the OK button, located at the bottom of the section.
To save all new or edited distributions and update the G/L distributions grid, click the Save button, located in the section header. To save the distribution(s), update the grid and clear the section for the entry of another distribution, click the Save/New button.
Note: If all distribution percentages do not add up to 100%, an error message displays.
To assign user rights to G/L Distributions processing, follow these steps:
- Navigate to Maintenance > new world ERP Suite > Security > Users. The User List page opens.
- Select (highlight) the user receiving rights to G/L Distributions processing.
- Click Permissions. The Permissions page for the selected user opens, showing a grid of application components.
- Click the Show Search link in the top-right corner of the page. The Component Name, Application and Company Name search fields display.
- In the Component Name field, type Workforce Administration Jobs - G/L Distributions.
- Select the Human Resources Application.
- Click Search. The grid refreshes to show only the G/L Distributionscomponent.
- Check the appropriate processes to assign the user.
- Click Save.
- For the authorization to take effect, the user must sign off and sign on the system.